Wednesday, January 20, 2010

How to track Original Location of an E-mail via its IP address

http://www.ipaddressreport.com/i/logo.gifHere’s a quick how-to guide on how you can track email to it’s originating location by figuring out the email’s IP address and looking it up. I have found this to be quite useful on many occasions for verification purposes since I receive lots of emails daily due to my blog. Tracking the IP address of an email sender does require looking at some technical details, so be ready to dig your heels in!

There are basically two steps involved in the process of tracking an email: find the IP address in the email header section and then look up the location of the IP address.

Finding the IP address of an email sender in GMail, Yahoo Mail, and Outlook

Let’s go ahead and take a look at how you would do this for Google, Yahoo and Outlook since those are the most popular email clients.

Google’s Gmail

1. Log into your account and open the email in question.

2. Click on the down arrow that’s to the right of the Reply link. Choose Show Original from the list.

track emails

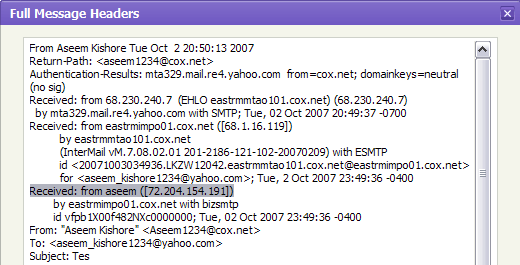
Now here’s the technical part that I was telling you about earlier! You need to look for the lines of text that start with “Received: from“. It might be easier to simply press Cntrl + F and perform a search for that phase. You’ll notice that there are several Received From’s in the message header. This is because the message header contains the IP addresses of all of servers involved in routing that email to you.

message header

To find the first computer that originally sent the email, you’ll have to find the Received From that’s farthest DOWN. As you can see from the above image, the first one is from a computer called “aseem” with the IP address 72.204.154.191. Then it was routed to my ISP’s server at eastrmmtao104.cox.net and so on and so forth till it got to your email server.

The computer aseem is my personal home computer and that’s my public IP address for my house! I’ll go through Yahoo and Outlook before talking about tracking the location of that IP address.

Yahoo Mail Beta

1. Log into your account and open the email (if you’re using Yahoo Mail Beta with the new preview interface, make sure you double-click on the email so that it opens in a new tab)

2. At the top right, you’ll see there is a drop-down option where Standard Header is selected by default.

3. Click on it and choose Full Header.

yahoo header

Again, you’ll see the same information as before, just in a different window:

message headers

Microsoft Outlook

1. Open the email in Outlook by double-clicking on it

2. Go to View at the top menu (the menu options for the email, not the main Outlook window) and choose Options.

outlook message headers

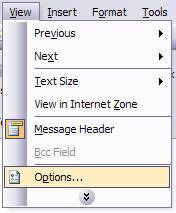
You’ll get a dialog box where you can set the message options and at the bottom you’ll see the Internet Headers box. For some silly reason, the box is very small and you have to scroll a lot, so it’s best to simply copy and paste the text into Notepad to view it more easily.

internet headers

Tracking the location of an IP address

Now that we have our originating IP address of 72.204.154.191, let’s find out where that is! You can do this by perform a location lookup on the IP address. My favorites are IP2Location and GeoBytes IP Locator.

GeoBytes gave me a big map of New Orleans, LA along with a bunch of other information about the location itself.

find ip address location

IP2Location also gave me the same information pretty much, including the ISP (Cox Communications). Of course, this is correct since I live in New Orleans!

If you want more information, you can do a WHOIS database search also. My favorite one is the ARIN WHOIS Database Search. This will give you information on who hosts that IP address and their registration information. You can always contact them to try and find more information on that particular IP address.

Have fun tracking down those emails! Questions, comments, or suggestions? Post a comment!

[tags]track email, track an email, track email ip, find email ip address, locate email, find location, locate ip address[/tags]

Friday, January 1, 2010

How to make Mozilla FireFox 150 Times Faster

Make a Funny Prank Virus

http://gvsnetworks.com/Images/virus-alert.gif

This is a totally harmless prank virus to pull on a friend or someone.

Steps

  1. Open notepad
  2. Type the following code in:

    @echo off
    echo VIRUS DETECTED
    pause
    echo DELETING VIRUS
    pause
    :1
    dir /s
    goto 1

    This will create a never ending stream of mindless code. This cannot be stopped easily.
  3. Save the file as "virus.bat"
  4. Have fun

For a Safer, faster XP Close Unwanted Services

http://www.natebattle.com/images/windows_logo.gif
To disable unneeded startup services for a safer, faster XP, use the "Services" Admin Tool (Control Panel > Administrative Tools > Services). If you are a single user of a non-networked machine, you can disable the following items, with no ill effect.

*Alerter
*Clipbook
*Computer Browser
*Fast User Switching
*Human Interface Access Devices
*Indexing Service (Slows the hard drive down)
*Messenger
*Net Logon (unnecessary unless networked on a Domain)
*Netmeeting Remote Desktop Sharing (disabled for extra security)
*Remote Desktop Help Session Manager (disabled for extra security)
*Remote Procedure Call Locator
*Remote Registry (disabled for extra security)
*Routing & Remote Access (disabled for extra security)
*Server
*SSDP Discovery Service (this is for the utterly pointless "Universal P'n'P", & leaves TCP Port 5000 wide open)
*TCP/IP NetBIOS Helper
*Telnet (disabled for extra security)
*Universal Plug and Play Device Host
*Upload Manager
*Windows Time
*Wireless Zero Configuration (for wireless networks)
*Workstation

Make Your Folders Private

http://www.tarpaflex.com/acatalog/privacy-policy-main.jpg

STEPS

•Open My Computer
•Double-click the drive where Windows is installed (usually drive (C:), unless you have more than one drive on your computer).
•If the contents of the drive are hidden, under System Tasks, click Show the contents of this drive.
•Double-click the Documents and Settings folder.
•Double-click your user folder.
•Right-click any folder in your user profile, and then click Properties.
•On the Sharing tab, select the Make this folder private so that only I have access to it check box.


Note

•To open My Computer, click Start, and then click My Computer.
•This option is only available for folders included in your user profile. Folders in your user profile include My Documents and its subfolders, Desktop, Start Menu, Cookies, and Favorites. If you do not make these folders private, they are available to everyone who uses your computer.
•When you make a folder private, all of its subfolders are private as well. For example, when you make My Documents private, you also make My Music and My Pictures private. When you share a folder, you also share all of its subfolders unless you make them private.
•You cannot make your folders private if your drive is not formatted as NTFS For information about converting your drive to NTFS

Fun Tricks With Notepad

Wanna learn notepad tricks?Here are 3 fun notepad tricks you can play with.. .Try them … Just for fun and experimentation.

1)How To Make Matrix With NotePad

I’am going to show you how to make cool Matrix batch file using notepad.
Open notepad and type in
@echo off
color 2
:start
echo %random% %random% %random% %random% %random% %random% %random% %random% %random% %random% %random% %random% %random% %random%
goto start

Save it as matrix.bat

Double click on file and it will open the matrix

2)Log trick

This is simple, open notepad and type .LOG

Save it as .LOG.txt

Whenever you open the file with that text in the first line in the notepad, it will insert the current date and time at the end of the file. You can start entering your text after that.

3)Open console box

Open Notepad and type starts like seen in picture below, but you can make as many as you would like.

Save it as start.bat . Depending on how many times you wrote start console boxes open.

Free Premium RapidShare Account


Rapidshare is a famous fie sharing site and for parallel Download's and for fast speed you guys need Premium Rapidshare Account. Here is a Trick to get Free Rapidshare Account No need To pay For Premium Account. Just sign up here.

How To Break Password Behind Stars *****

How To Break Password Behind The Stars

In this post i'll show you how to see passwords behind the asterisks*******, in case you forgot what you used or better if you want to know yours friend password from his email or facebook account that he had typed and left it. This tutorial will help you.

1) How to break hidden passwords ***** in Mozilla Firefox

All you have to do is just to copy/paste the following javascript code in the adress bar whenever you are on a site with a login form and the password behind the ****** will be displayed.


Here is another trick to view all of the stored passwords in Firefox.

1. Open Firefox

2. Go to Tools –> Options.

3.
Select the Security Tab.

4.
Click on Saved Passwords.

5.
If you want to look at the passwords, press 'Show Passwords'.


2) How to break hidden passwords ******** in Internet Explorer


Download Asterisk Key and run it. When you are on a site with a login form click Show Internet Explorer Passwords and it will show you the password behind the *****.


3) How to break hidden passwords ***** in some applications


There is a freeware utility called SC-PassUnleash which allows you to read any of the passwords that are covered by the asterisks by simply dragging a cursor over such a password field. But, the bad thing is that it only works on certain FTP clients and email clients.

Download SC-PassUnleash


Hope this tutorial was useful for you.